

I got the idea last November when I realized that since our new house has really tall ceilings, I can have a really tall tree, thus my beautiful hand-knit tree skirt would look woefully inadequate. I "obviously" needed to make something new, so I trolled Google to find something that caught my interest. I landed upon this, which got my wheels-a-turnin'. I decided to use my favorite new home decor fabric, painters drop cloth (from your closest hardware store). It comes in pretty big pieces, and I did not want a seam in my skirt. And I chose to do mostly off-white poinsettias, with a few dark red ones thrown in for interest. I have to say, I LOVE how it turned out. This is not a hard project, however depending on the size of your skirt, it can be a bit of a time-consuming one.
I cannot tell you exactly what you will need to make your own skirt, as it totally depends on the size you choose. That alone is tricky. I decided to make mine as big as my large drop cloth would allow, which ended up a 65 inch total diameter. However, in general, you will need the following:
- 1 large painters drop cloth, washed several times and dried in the drier
- extra-wide double-fold bias tape - you will need enough to go around the outer circumference of your tree skirt, the inner circumference (where the tree goes) and down a slit, like so:

- wool felt in the colors of your choice (I got mine from Prairie Point Junction). I cannot tell you how much you need, though you can probably do some sort of computation to figure it out, once you download the petal template. You'll need a lot! I made approximately 100 off-white poinsettias, and 20 red.
- small white pearl beads (from Joanns or such store)
- 3 button cover kits, containing 6 buttons total, 1 1/2 inches in size (or whatever number of buttons you desire down the side of the skirt)
- approximately 1 yard of twisted cord for button holes
- thread, scissors, needle, tape measure
- poinsettia petal template - you do not need to use my template! Feel free to make your own based on whatever size poinsettias you prefer. I made LOTS of mock-up poinsettias until I figured out what size I liked best, so feel free to use mine if you like it!

To start, cut the outer circle of your tree skirt.


How wide do you want the hole for the tree and stand? I made mine 9 inches in diameter, so I measured out 4 1/2 inches and made a bunch of marks until I could connect that circle as well. Now cut out on your lines. You will end up with a donut.

Bring your tree skirt to the sewing machine and sew on the bias tape. I tend to do this in just one step, sandwiching the fabric in-between both sides of the bias tape at once and stitching one time. If you do it this way, make sure you look closely at the bias tape first. One side is a tad bit shorter in width than the other. Make the shorter side the top. When you have this as the top and stitch close to the edge, you are sure to catch the tape on the back, because it is a bit wider! I started at the top of the skirt, went down one side, around the outer circle, back up the other side, and around the inner circle. You will need to sew lengths of bias tape together to make it long enough to do this.

Now is the time to start cutting out poinsettia petals. Make a few copies of the template, grab your scissors, some pins and your felt, and sit down on the sofa and get comfortable. You might want to do this during a television show or series that you have recorded but not yet watched. If you have another adult in your home, solicit their assistance! There is a lot of cutting to do! Cut, cut, cut until you have a giant stack of petals all over your floor/table/sofa/etc! Finally, you can start to construct your poinsettias!

Step 1: Gather your tools around you. You'll need some small scissors, a container that holds your little pearl beads, thread, a needle, and a stack of petals. A word of advice: Keep that jar of beads far away from the edge of any surface. It is a terrible thing if you happen to knock it over and then have a zillion tiny pearls all over your floor....


Step 4: Pinch together a second petal and place it over the top of the first one. You don't want it to cross at a right angle, just slightly angled so there is space for your third petal. Sew two stitches, through the first petal and across the middle of the second petal.
Step 5: Do the same thing again, placing the third petal on the top of the first two, and sew ONE stitch across the center.
Step 6: Put your needle through all three petals, up to one edge of that first stitch. Place your pearl on your needle, and sew down through approximately the same spot, affixing the pearl to the top poinsettia petal.
Step 7: Do the same with pearl #2, affixing it to the other side of the petal. Now bring that thread to the back of the poinsettia and make a knot.
Now you have a choice. You could cut the thread and sew a bunch of poinsettias together before sewing them onto the skirt, or you could sew them onto the skirt as you go. I sewed them to the skirt as I went along, since the thread was already there and ready. Oh, and I used white thread the entire time, even on the red poinsettias. You can't tell!

Step 9: Sew the poinsettia to the skirt, making a few stitches around in a circle and making sure that all of the stitches stay within the width of the bottom petal. You will feel where the thickest part of the poinsettia is, and you want to stay within that area. This ensures that your stitches will not show through the front! Ta-da! You have created and sewn on your first poinsettia! Now you just need to do a bunch more! Space them however close together you like, and add in your second color when it seems right to you, if you are using two colors.
It does seem very tedious, I know. It is, but it is also mindless, so you could do this while relaxing in front of the television at night, or while chatting with a friend. Before you know it, you'll be close to the end!
Once you get there, you are ready to get out those button cover kits and use them with whatever material you choose. I used the red felt. Space three of them however you like down the side of your skirt. I placed the second one in the center of the width of the skirt, and placed the other two 7 1/2 inches away on each side. Sew them onto your skirt, making sure you create a bit of a shank underneath the button so there is space between it and the fabric.

Cut the twisted cord to approximately 8 inches and burn the ends to help them resist unraveling. Sew the ends together, and then affix the loop on the opposite side of the skirt from the button. I spaced the buttons so the edges were 1 inch in from the edge, and placed the loop just to the left of the mark for the left button, so that the shank would be inside of the loop. If you look closely, you can sort of see a blue mark just where the cord comes together. That is where the button is sewn.

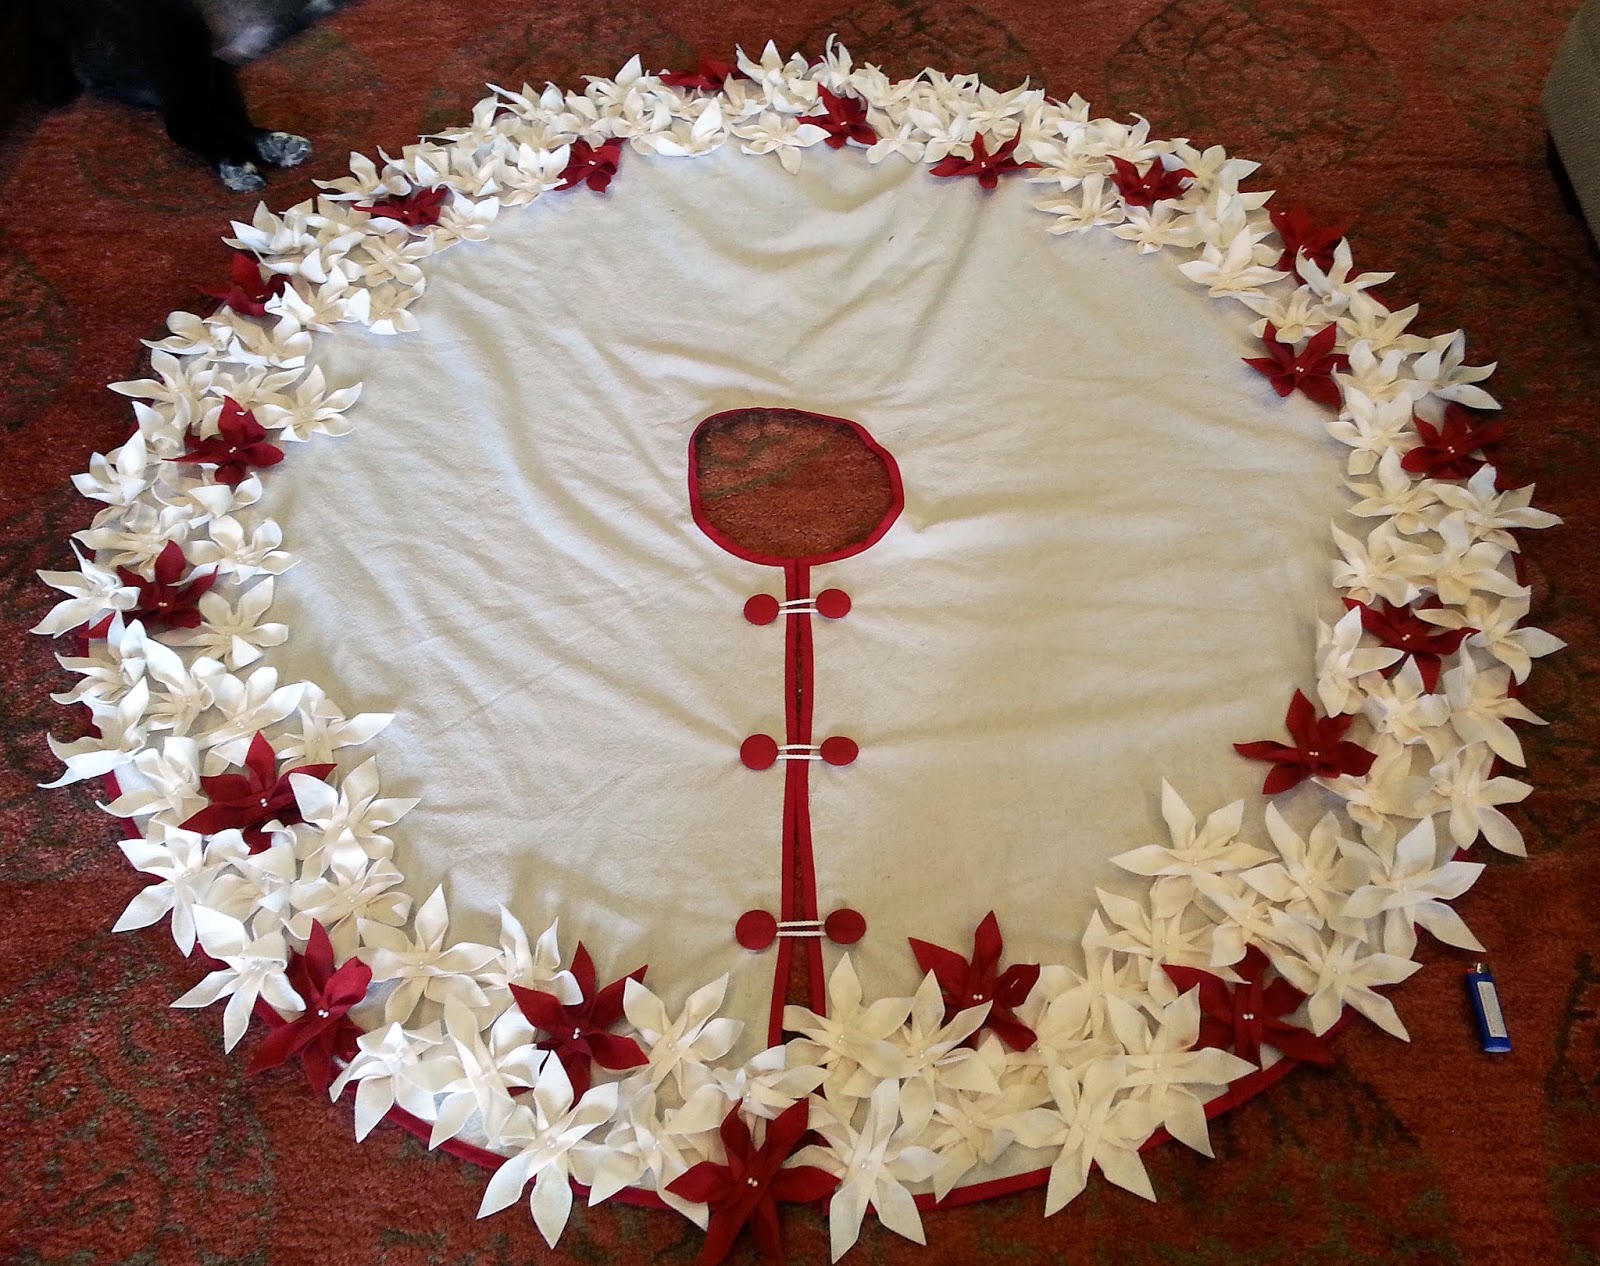
It's done! An amazing, beautiful new tree skirt! I started this last November, and worked on it until it simply needed to be placed under the tree. It was about halfway done. I turned it so that the finished part was towards the front and arranged the packages so that the empty places were less noticeable! Then when the holidays were over, I folded it up and it sat in my craft room, waiting for me to remember it and finish it up. I recently got my motivation going again, and it's finished! It didn't take long, I just had to sit down and do it! This isn't a super-fast project, but it honestly isn't so bad, once you get going! And really, I intend to use this thing for many, many years, so it's okay that it took a while to create. I think it's a masterpiece!
This is gorgeous!
ReplyDelete